I had the opportunity to do something really cool a few weeks ago. My friend, Jack invited me to head up to Artist Point near Mt. Baker and take star pictures. I was quite excited as the only other real chance I had to take star pictures was for the Manshower (a.k.a. Shitty Backpack -- story coming soon) in the Three Sisters Wilderness near Bend, Oregon. That was my first real attempt at astrophotography, and while Jack is a pretty good teacher, I had absolutely no idea what I was doing.
So, after a lovely dinner with Jack and his wife Lauren the two of us hopped in the car to head on up for some star shots. For those of you who have been under a rock for the past two months, you should know that there have been massive wildfires in eastern Washington, and on this particular weekend there was an easterly wind that was blowing all of the smoke from the fires to the west. This made for a rather smoky evening.
Regardless, when we arrived at Artist Point we hiked up a little hill to get a clear view to the south of the Milky Way directly over Mt. Baker. We tried taking a few photos and while I managed to get one nice shot, it was just too smoky to get any real nice star shots.
Since I'm pretty new at all of this, I'm not going to spend too much time introducing the photos or talking about "the ambiance." Rather, I am going to upload several photos and talk through them. How I took them and what I did for post processing. The idea is to pass along what I learned while at the same time looking for advice from people who know what they are doing.
Some info. I have a Panasonic Lumix FZ 1000. This is actually a pretty nice little point and shoot, but a point and shoot nonetheless. I learned pretty quickly that this is a VERY noisy camera, as the sensor is only 1". For now, this is all I have and I don't have the money to buy a nice new camera with a bunch of lenses so getting a new camera is not an option. At least for now. My wife says that if I stick with photography for another year or so that she will let me buy a new camera.
 |
| The Smoky Way (RAWish) |
 |
Smoky Way (stacked)
The Milky Way rises behind Mt. Baker.
The "clouds" in the front are actually smoke
from several fires in the area. |
These two photo's are exactly the same, but they are processed differently. The photo's are a stack of 10 exposures. Each shot was a 20 second exposure at ISO 6400. The difference was in the processing.
For the photo on the left I stacked the 10 exposures using Photoshop and then tried to remove the noise by converting to a Smart Object and then using the "median" stacking (for more information check out
this great video). I have heard (and read) that this is one of the best ways to remove noise from photos, and it works really well if you look at the Milky Way shot later on. The issue in this case is the smoke moves. So, to get the stack to work I either had to mask the the bottom third of the photo, including the smoke, or let Photoshop auto-align the layers with the smoke unmasked, in which case it auto-aligned based on the smoke rather than the stars. So, while the noise is greatly reduced, I loose all of the stars in the horizon and the smoke gets a "flowing water" look rather than the sharp, cloud.
For the photo on the right, I used the noise reduction technique for the foreground only, and then picked my favorite star/cloud shot and used a layer mask. I really don't think I achieved much by doing the noise reduction on the foreground, so I probably would have been just as well off by using the RAW file. Personally, I prefer the picture on the right. . .noise be damned, I like the stars.
 |
Galactic Bump (Stacked)
After the show died down (again) we flipped
around to try to get more star shots.
As you can tell, there was still a fair amount
of smoke and light pollution, but hey,
the primary reason we went up here was to
get star shots so we at least had to try. |
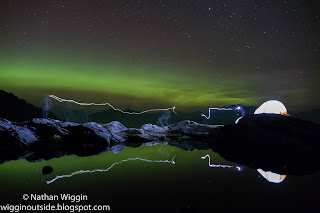
The photo directly left was taken on the same night, but from behind a ridge so the smoke wasn't as prevalent. This is a stack of 9 total exposures, all taken at ISO 6400. Eight of them were 20 seconds, and one was only 13 seconds (I cut the exposure short because the northern lights were acting up again). I used the same median stacking technique to reduce noise and it came out pretty well. I maintain a lot of the sharpness and drastically reduced the noise. When I took these, I wasn't planning on doing the stacking, mainly due to ignorance, so I didn't take enough exposures. Next time I go out I will do 20-25 exposures and stack those.
One other thing I noticed was that it appears that the stars are moving in my shots. I'm not sure what is causing this. All of these shots were taken with a 25mm lens (well 25mm equivalent) with a 20 second exposure, which according to all available materials, should minimize/eliminate star movement. I thought it was a side effect of stacking, but when I zoom in on the RAW files I still notice the movement, although not quite as much. This suggests stacking is not perfect and does add some movement, but that perhaps my exposures are too long to begin with. Next time I go out I am also going to try slightly shorter exposures (15-18 seconds).
And now the show begins. This was my first time ever seeing Norther Lights, let alone photographing them so I was quite excited. I think I should let everyone know that the sky did
NOT look like this to the naked eye. Yes, it was brighter than a typical night sky, and yes, we did see pillars shooting way up there, but for the most part we didn't really see the rich colors you see in the photographs. Cameras see more than the naked eye, especially when they are absorbing light from 10-20 seconds.
 |
Curiosity
|
We noticed that the sky to the north was rather bright. It was the beginning of a Northern Lights show.
ISO 3200
F2.8
20 Second exposureTemp: 3786, Tint +75
The Aurora Borealis shots are a mixture between 20 second exposures at ISO 3200 and 10 second exposures at ISO 6400. I noticed significantly less noise with the ISO 3200 shots, but feel that I didn't get quite as much sharpness/definition as the 6400 shots due to the longer exposure. Next time I get the opportunity to do this I will play around a bit more and try shorter exposures with ISO 3200. It is a fine balance between minimizing noise and not under-exposing the shots. I'm not going to bore you with all of the details regarding how each picture was processed, but I will give a bit of information for each one such as camera settings, and some quick stats about post processing. Again, I'm not really sure what I'm doing, so it was all pretty experimental.
 |
| Lying in the storm |
This is me lying on the cold , cold rocks. Jack found a tarn near by which made for a perfect foreground. I brought a tent which we set up on some rocks. Jack had some light pucks that we tossed in the tent as well.
ISO 6400
F2.8
13 Second exposureTemp: 3905, Tint +75
 |
| Northern . . .head lights |
A behind the scenes shot of Jack and I getting into position for a pose.
ISO 3200
F2.8
20 Second exposureTemp: 3905, Tint +34
I had some fun ideas while out there. The first of which was to take a few frames specifically exposed for the tent. You can imagine that a 20 second exposure would completely over-expose the tent and make it appear totally white, and you would be correct.
The second idea was to try light painting the rocks. The light painting consisted of me running my headlamp across the rocks during the exposures. I tried both red and white light. . .the red looked really cool at night, but didn't really work out once I got the pictures back to the PC.
On the back end, I imported the Aurora exposure, tent exposure, then one of the rock painting exposures and worked with layer masks to blend the three together. This resulted in a photo where the Northern Lights look good, the tent is not blown out, and there is a lot more detail in the rocks. I didn't do this on all of the photos below, but I actually like it.
 |
| Beam Me Up |
Jack and I figured that this would make an interesting pose. The smoke in the air made our headlamp beams quite visible which I like.
ISO 3200
F2.8
20 Second exposureTemp: 3781, Tint +61
 |
| Organ of Light |
 |
| Captivated |
 |
| Touchdown! |
 |
| Lo and Behold |
 |
| Glory |
 |
| Silhouette |
The light show waxed and waned, but slowly built intensity with each peak. During this peak the pillars were incredibly bright and reminded me of a pipe organ.
ISO 6400
F2.8
13 Second exposureTemp: 3960, Tint +89
 |
| Curtain Call |
 |
| Grand Finale |
After a while we forgot ended up caught up just watching the light show.
ISO 6400
F2.8
13 Second exposureTemp: 4050, Tint +84
In hindsight, this pose makes no sense, but we thought it would be kind of cool to do the "touchdown" type pose.
FYI, this is Jack's favorite photo from a technical standpoint. . .I can see that now, so may go back and redo some of the others with these settings.
ISO 6400
F2.8
13 Second exposureTemp: 3905, Tint +96
Jack got caught up and decided to just sit and watch for a while. In the mean-time I was still trying to figure out how to take pictures.
ISO 3200
F2.8
20 Second exposureTemp: 3850, Tint +41
Ok, ok, I know I said I wasn't a fan of the "touchdown" pose, but in this case I think it works. Also, Jack has a much better version of this picture. Partly because he has an awesome 18mm lense, but mainly because he is much better at this.
ISO 3200
F2.8
20 Second exposureTemp: 3850, Tint +41
The lights died down again for a while and we decided to take down the tent during the lull to give a different mood. Personally, I like not having the tent as it is less distracting and allows for more color. One of the things that I really like about this shot is the ability to really see the path the green lights took through the atmosphere. You can sort of see it in other photos, but I think that it is more prevalent in this one.
ISO 6400
F2.8
13 Second exposureTemp: 3850, Tint +64
I really like how the pillars make it look like a curtain is being pulled in front of the stage. It was a bit ironic given that the show ended again about 5 minutes after this shot.
ISO 6400
F2.8
213 Second exposure
Temp: 3850 Tint +64
Yet again, we were interrupted by bright skies to the north. This time it truly was the last show of the evening. Additionally, smoke was moving in again creating haze.
ISO 6400
F2.8
13 Second exposureTemp: 3960, Tint +64
If you made it this far. . wow, thanks. Please feel free to leave comments below. Any suggestions? What is your favorite picture and why?
I'm going to start posting more regularly. It will be a mixture of current adventures (we are about a week away from having our first baby) and summer trips, including the aforementioned Shitty Backpack.
Oh, and if you are interested, check out Jack's blog (http://www.jmongol.com/). His photos are amazing (much better than mine), is a great teacher, and as inspired me to get out, take more pictures, and restart my blog. Everyone say "hi jack!" and try to crash his server:)