Thursday, August 25, 2016

Night Court

First thing's first.  Before you continue reading click here and let it play in the background.  Go ahead. . .I'll wait.  Ok, now you should be in a better mood.  On to the blog!

We have done quite a bit of traveling over the past month or so and I was originally going to wait until I either processed all of the images, or at least all of them from a single trip before posting, but then I decided that it was taking too long and I should write about what I have now since even though they are from separate trips, they share similar subject matter--the dark (BOO!).

First, the trip to New Jersey.  As I mentioned earlier, we traveled to NJ to see my in-laws.  While there we decided to spend a night in "The City" to explore. . and to take pictures.  One of the primary reasons I wanted to go to NYC was to get a very specific picture of the One World Trade Center. Sadly, due to technical difficulties, and that security guards were literally chasing us off of the property, I didn't quite get what I was going for, but I got close.


After the half-successful OWTC shoot, Galen and I wandered around aimlessly for a while. We took the subway over to Brooklyn to take pics of the Brooklyn Bridge and had a fantastic time.  As soon as we got off the subway we be-lined it to the base of the bridge where I got this shot.

Da Bridge
Brooklyn Bride and Manhattan
This was actually quite difficult to process. First, it was a blend of three shots: 2.5 seconds (for the city lights), 6 seconds (base exposure), and 10 seconds (bring in a few more highlights), but blending the exposures wasn't the hard part. For some reason I took this using the Rokinon 14mm f/2.8 and let Galen use the really nice Canon 16-35 f/4.0 L lens (that's right I was using a $200 lens and letting Galen use the $1,200 lens, no I don't know why).  The problem with the Roki is that it has massive barrel distortion. Look at the RAW file from the base exposure below, notice how the bridge and the WTC are both "leaning in".  After I did my post processing touch-ups I spent nearly an hour trying to straighten everything out. That was the hardest part.

"Base" Exposure RAW file, notice how everything is leaning?
I popped on the Canon 70-200mm f/4.0 L lens and took a a similar shot to get a different perspective.  This one is a single raw file with minor lighting adjustments such as white balance, and bringing down the highlights.
The City Never Sleeps
Single RAW file: 90 sec, f/11, ISO 100
As we were walking away from the bridge I noticed a little park of sorts. Really, it was more of a garden, or a path.  The whole thing was no more than 25 meters wide and 50 meters long.  Anyway, it drew my eye so I wanted to walk through it to see if there was anything interesting.  I am very glad I did because while there I got what I at the time called the "shot of the night".


Da Pahk (yes, no "r")
Single RAW file: 15sec, f/8.0, ISO 100
After much whooping and "giggidy"ing we wandered our way through Brooklyn to a really nice little bar and had a beer.  Servers in NYC are some of the best I have ever encountered and this bar tender was no exception.  We told him we were looking for interesting places from which to take pictures and he said we had to check out the Brooklyn Heights Promenade.  Thank you Mr. Bartender.

For those who don't know, the Brooklyn Heights Promenade is a park/walkway right on the edge of Brooklyn elevated about 200 feet above the east river.  It provides unobstructed views of Manhattan and it was amazing, best view in the entire city. . .so far.

As amazing as the view was, i only managed to grab one good shot?
Empire State Bridges
Stack of 3 shots: 10 seconds (city lights), 20 seconds (base), 10 seconds (highlights)
Finally, around 2:30AM, we made our way back to the hotel.  We passed by this building on the way and I took a quick handheld shot (very hard to do at night when it is dark).  I just thought it was interesting.  Nothing special.
Single RAW file: handheld 1/20 sec, 17mm, f/4.0, ISO 800
I took other shots while in New York, but those are for another time (not part of the "night" theme).

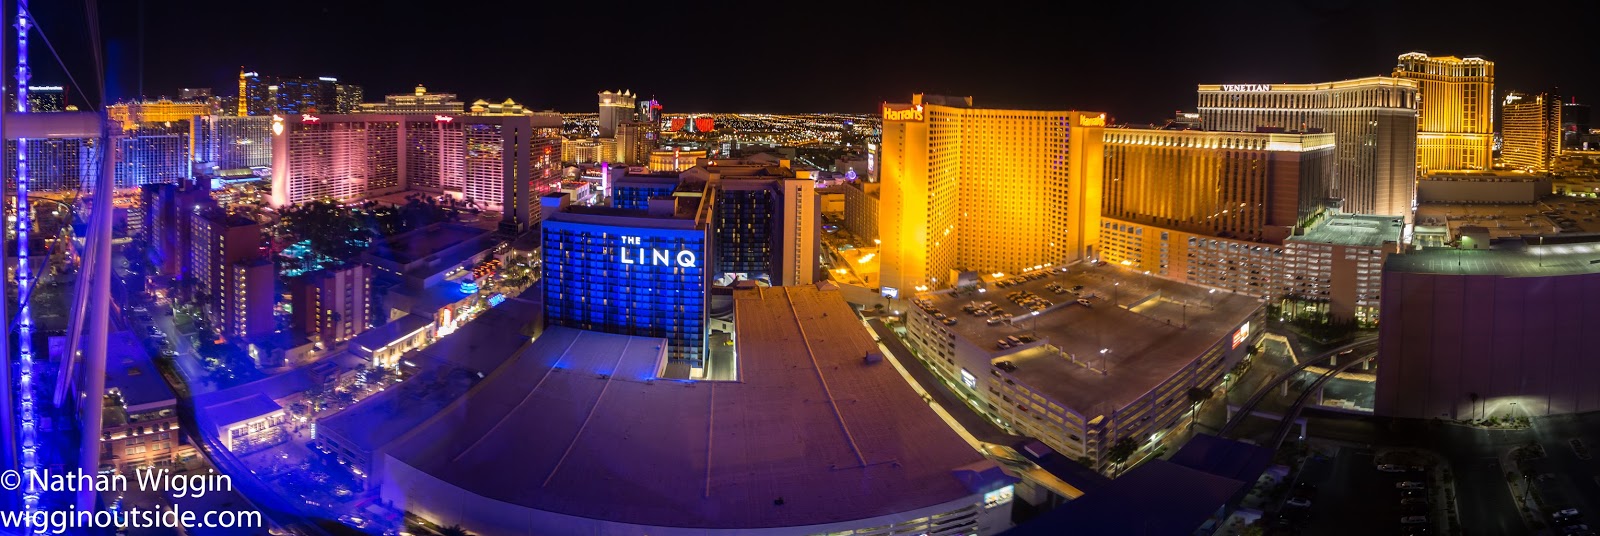
We returned to Seattle, spent a few days at home, then made a road trip across Idaho for the 4th of July (yeah, busy few weeks).  We stopped in Boise for a few days.  Before heading out there I searched on Google for any Boise Blue Hour pictures and was surprised at how few were out there, especially given how the Train Depot creates a great viewpoint of the City.  So, during the first evening there I set up shop at the Depot just before sunset and hung out for an hour or two.

I was rewarded in two ways. The first was a really nice blue hour / car trails shot.  Yes, it is a composition of several shots.  I took a base blue hour shot to get the sky and the city (70mm, 35 seconds, f/4.0, ISO 50 - for longer exposure time), I waited about 30 minutes for it to get darker then took three more shots ranging from 30 seconds to 140 seconds. The purpose of these shots was to capture more car trails.  Once I had a few exposures, I loaded them into Photoshop and basically did a Blend-->Lighten which compares each frame pixel by pixel and only shows the brightest pixel. This gave me the lighter sky, foothills, and buildings, but brought out the city lights and the car trails.

Boise Blue Hour
I started packing up then turned around and noticed that the Train Depot was perfectly framed by Jupiter (right) and mars (left).  I quickly switched lenses (to the 16-35), composed the shot and fired.  Yes, this is more than one shot (it's two).  Exposing for the sky / planets required a 30 second exposure which light up the depot like a Christmas tree so I had to do a shorter (3 second) exposure to get the depot.

Planetary Framing (make this full size to see planets)
If you have followed my blog at all, well, first, thanks, second, there can't be very many of you, and third you may have notices this shot posted way back in my Vantage Rocks blog.  That was taken in December of 2015 and while I really like the location, I was never really happy with the shot (learning process) so one of the key goals of my trip to Idaho Falls was to hit that location again and get a Milky Way shot.  Unfortunately, the clouds were rolling in so I had to act quickly.  Even so, they cut out a good portion of the Milky Way.  Oh well, there is always next year.  This image is a composition of two exposures.  The first was exposing for the sky which I had to do quickly before the clouds completely covered the Milky Way (14mm, 30 sec, f/2.8, ISO 3200).  The second was exposed for the foreground (14mm, 6 sec, f/2.8, ISO 3200).  Next time I do this (yes, there will be a next time damnit) I will remember to drop the ISO for the foreground so the shot is not so noisy.
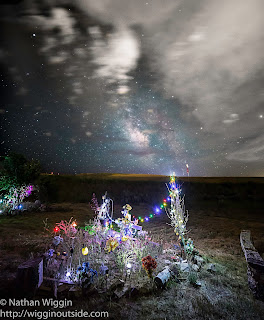
Roadside Memorial
Well, that's it for this time.  Sorry it took me so long to get it written and up.  I keep trying to post more often but it's a lot of work and travel+baby+life makes this difficult. Anyway, for making it this far, enjoy a bonus baby pic.


Saturday, July 23, 2016

Sunsets part Deaux. . . and a few sunrises

About 45 minutes north of Seattle lies the little suburb of Mukilteo which has a very pretty park along the shore of the Puget Sound.  I have seen a few pretty photos from there so decided to head up and check it out. There were two things driving my renewed interest in shooting sunset.

  1. Playing with depth of field. I wanted to create great depth of field by having things really close and really far away, all in focus.
  2. I had just purchased the Lee Filter Kit; the "big stopper" 10-stop neutral density filter and three graduated ND filters (1,2,3 stop) and sunsets are fantastic opportunity to try them out.
  3. It was Memorial Day Weekend and I had rented the Canon EF 17-40mm f/4L USM Ultra Wide Zoom Lens from Glazers Camera and wanted to play with it.

So, up to Mukilteo I went.  The photos below are from two different trips. The first trip resulted in one good sunset shot then I wanted to play around near the lighthouse. One HUGE thing I learned is that if you are setting up for a 5-10 minute exposure and using mirror lockup. . .make sure to actually lock up the mirror before "starting" the 10 minute exposure (oops).

Lighthouse Sunset
Single RAW file, 17mm, f/22, 25 sec, ISO 50
10-Stop ND plus 3-Stop grad (top left)
Rocky Shore
2 Exposures:
Both: with 10-Stop ND
Both: 5-Stop grad ND as well
Both: 19mm, f/22, ISO 50
One @ 4 sec, One @ 5 sec
Blue House
Single RAW File
24mm, f/122, 128 sec, ISO 100
1-stop grad ND on left side
2-stop grad ND on right side
middle open.
I took the second trip up there primarily as an excuse to hang out with a buddy of mine, but I also had an idea for a shot, involving long exposures and large depth of field.
Stumped Sunset
Single RAW file
40mm, f/16, 75 sec, ISO 100
10-Stop ND+5-Stop Grad ND
Single RAW file
35mm, f/16, 60 sec, ISO 100
10-Stop ND+5-stop Grad ND


On to something different, but still sunset related.  If you have read some of my past blogs you may remember this photo of the Aurora bridge.  While I like it, I feel that the mountain (Mt. Rainier) appears too small as to my eye the mountain seems to fill the frame a little more.  

Ever since taking the picture I have wanted to recreate it using a longer lens (longer focal lengths tend to bring the background forward).  To get that reach I went out to Glazers and rented the Canon EF 100-400mm f/4-5.6L IS USM Telephoto Zoom Lens.  I had read terrific reviews of that lens (all 100% true) and wanted to try it out.  If I had 2 grand to drop on a lens, this is the one I would buy.

Armed with the rental lens I headed back out to the Aurora Bridge, and framed up for the shot. . .I didn't get it.  The contrast between the dark bridge and the bright sunset-lit mountain required the use of multiple exposures.  However, there were leaves on the trees this time and there was a rather strong wind.  All this meant that I couldn't blend the exposures. . .DAMN!  Looks like I will have to wait until winter and try again.

However, it wasn't a total loss, I managed to get a shot (handheld apparently) of the same arch looking across the canal to the other side.  Not as many leaves in this shot so it worked out.  Similar to my "target shot" there was a huge amount of contrast between the near bridge and the far strut so I ended up using three exposures to capture the entire range.

Bridges Within Bridges
3 exposures (handheld) stacked
1: 106mm, f/11, 1/320, ISO 1600
2: 106mm, f/11, 1/80, ISO 800
3: 106mm, f11, 1/40, ISO 800
(I don't recall why I switched to ISO 800)


As I was packing it up to leave I noticed a sculpture of a  picture frame.  I looked through it and went "ah hah" perfect.  Unfortunately I had lost the light so I had to wait until the next morning and capture it during sunrise.  I tried shooting this in a few ways and realized that I couldn't get enough depth of field through a single exposure no matter what aperture I tried so it gave me the opportunity to try focus stacking (which I did a meh job doing, the "easy" photoshop method doesn't work at all so I tried to hand blend them).

Similar to the previous two shots, this ALSO required multiple exposures to capture the dynamic range of the mountain/town scene.  I am willing to try this again to get the the focus blending to work better.

Just as with the previous evening, as I was walking back to the car I saw something really cool. . .in this case it was the underside of the bridge lit by the rising sun.  And, just as with the previous evening, I fired off a few quick handheld shots.  Personally, I like this one much more than the Framed shot

Framed
Four total Exposures
1: Focus-frame: 200mm, f/11, 4 sec, ISO 400
2: Focus background: 200mm, f/11, 1 sec, ISO 100
3: Focus background: 200mm, f/11, 2 sec, ISO 100
4: Focus background: 200mm, f/11, 4 sec, ISO 100
Living Under the Bridge
2 Exposures-Handheld
1: 106mm, f/11, 1/250 sec, ISO 1600
2: 106mm, f/11, 1/160 sec, ISO 1600ISO was so high because I was shooting
handheld and didn't want motion blur


Well, that's it for now.  I have quite a few shots from my recent trips to New Jersey (you already saw the baby ones), New York City (ohh, exciting), Idaho, some Macro shots, and a handful of hiking shots.  I recently decided that I'm not going to wait until I finish processing them to post blogs so hopefully I will actually start posting on some sort of regular basis.

Saturday, July 16, 2016

Look. . .BABY!!!

Here are some baby photos to please those who wish to see them.  Not much to say, but I'll do a brief intro.

First off, a few random around the house shots.  I rented a few lenses for Memorial Day weekend; one of which was the Canon 100mm f/2.8L IS Macro (more shots from this later).  These four shots were taken with that lens.  I was also playing with flash trying to create a well exposed baby but a very over-exposed, almost white background.  Personally, I really like it as it creates a very sharp contrast/focal point.  Oh, one more thing. . .while the Canon 100mm f/2.8L is a FAST lens, taking a shot of a baby on the go is pretty damn difficult. (Andrew was 8 months old at the time--taken in May, 2016--and was starting to get the crawling bit down. Notice the little bruise on his left cheek?  I think he was holding himself against a corner and lost his balance. . .yeah he started getting a lot of little bumps/bruises once he started getting mobile).
f/2.8, 1/125 sec, ISO 400 Flash (off-camera to back/left)

f/2.8, 1/200sec, ISO 400 Flash (almost directly behind Andrew)


f/2.8, 1/125, ISO 800, Flash (top left corner)


f/4.0, 1/50, ISO 800, NO Flash (different lens from others).


In late June we went to New Jersey to see my bro-in-law and his wife, for that trip I rented two lenses, the Canon 16-35 f/4.0L IS (more on this lens later) and the Canon 70-200 f/4.0L IS (similarly, more on this later).  While thee we went to a park and put Andrew in his first swing!  I wanted to try the panning technique to imply motion. . .these first few shots are that attempt.  The idea is to slow your shutter down a bit so you are firing somewhere around 1/10 to 1/30 second and pan the camera so that you subject looks still, but the background implies movement.  I also needed some reach because I wanted a pretty tight shot so these were taken with the 70-200 at 93mm. Finally, I needed a somewhat more shallow depth of field so didn't want to go beyond f/8.0ish so I knew I would need to use filters of something to slow the light down a bit.  I played around a bit and it was too bright so ended up using a circular polarizer to cut the light by ~2 stops (I haven't measured that yet, but I should).

Also, these were taken in June of 2016, so about 1  month after the previous four shots (Andrew was 9 months old).

f/8.0, 1/15 sec, ISO 125


The next thing I wanted to do was play with depth of field; specifically, I wanted to see what type of depth of field I had at f/4.0 in the 70-200 range.  I knew that I would be trying to freeze motion so I took off the polarizer to gain that 2-stops of light. The fun thing about taking depth-of-field shots while Andrew was on the swing was I could also see what the impact of distance from camera would have on depth-of-field as well.
f/8.0, 1/200 sec, ISO 400.
Note, I wanted slightly more depth of field
because I wanted Kyra somewhat in focus
(FYI: she didn't know she was in the shot)

f/4.0, 1/1600 sec, ISO 400
Note, he was much farther away so
more s in focus


f/4.0, 1/1000 sec, ISO 400
Very close which is why DoF is very shallow
I like the focus on the feet


Finally, here are some old-timey shots of Andrew and his great grandmother (95 years old, taken late June 2016).  I played with the "nifty-fifty" for these shots (I wanted a really fast lens and would be about 7-10 feet so would get adequate DoF for portraits).  I want everyone to notice the scabs on Andrew's head. During his (near to last) visit to the gym he decided to scramble out of his car seat and crawl over to the treadmill where he proceeded to headbutt the thing. . . babies. . .well, they ain't too smart.
f/2.0, 1/200, ISO 200

f/2.8, 1/160, ISO 400
(it is my goal ot give Kyra a pic of  Andrew crying every month for his first 12 months of life)

f/2.8, 1/40, ISO 100


OK, bonus shot of Andrew at our friend's house. He had the "Andy Grumpkins" face and I liked it.
f/4.0, 1/50 sec, ISO 1600
(Canon 70-200)

Thursday, April 14, 2016

What Happens in Vegas. . .

. . .ends up in this blog.

As I have been touting for quite some time, I recently had a "work conference" in Las Vegas.  No, really, I did.  There is a joint chapter conference co-hosted by the Southwest and Northwest chapters of the Marketing Research Association that is held each year in Las Vegas. It is, of course, a lot of fun, but it is also fairly educational as well.   The conference runs Tuesday through Thursday afternoon(s).  Given, a) the difficulties of getting an early flight TO Vegas, and b) that it was significantly cheaper to fly out on Monday than Tuesday, I decided to leave a day early.  This, conveniently gave me a free evening/night in Vegas, alone, with no baby. . .Hehe, allright.

Vegas is only a few hours from one of the last remaining dark sky sites in the US, Death Valley National Park so I figured I would use my free night to go out and try my  hand at night sky photography.

I arrived in Vegas, picked up my car (yep, it is cheaper to rent a car for 3 days than it is to take a taxi to/from the airport) and hit the open road. The plan was to start at Rhyolite, an old ghost town just outside the National Park, kill time there until the rise of the Milky Way around 2 AM, then head to the national park and get some Milky Way shots.

The drive out was long, but also a little amusing. Turns out that Highway 95 runs "right by" Area 51.  By "right by" I mean 2 hours away, but it is about as close as you can get without risking black helicopters and men with guns stopping you, but I digress.  There is an Area 51 themed truck stop in the Amargosa Valley, naturally I had to stop and check it out.
This was as close as I came to seeing any aliens
It was pretty cool inside.  I highly recommend going in. About three-quarters of the truck stop is dedicated to memorabilia, trinkets, touristy stuff, etc.  There is also a truck stop dinner there, but sadly it was closed.  Too bad because I was really hungry. I spent about an hour looking around at all of the stuff and eventually purchased an Area 51 "no trespassing" sign and a brothel themed shot glass.  "What's that?" you ask.  "A BROTHEL themed shot glass?!!?"  Yep, turns out that the truck stop is attached to a brothel, appropriately named the "Alien Cathouse".
I wonder if the hookers are little and green?
After a photo and a chuckle, back on the road. I should note that it is a bit disconcerting when, already in the middle of nowhere, the locals have no idea where you are going.  I asked for directions/distance to Rhyolite and everyone just said "where?".   Fortunately, it wasn't that far away.  While Google Maps says it is 40 minutes, I don't think Google realizes that the highway is pretty much abandoned, smooth, great visibility, and FAST (posted NIGHTTIME speed limit was 75mph). I made it to Rhyolite in a little under half an hour.

I wasn't sure what I wanted to do while there.  I knew it was a ghost town and had a few crumbling buildings, but it was REALLY dark and I couldn't see anything.  As I drove through "town" I saw something reflect my headlights off to the right so I backed up and found a little road/parking lot.  It was an old, rusted out truck. . .PERFECT.  I set up shop and hung out here for a few hours.
A few interesting things to note, this shot was taken looking Southwest.  LAX and Bakersfield are directly behind the truck (and a few hundred miles away) from this vantage point. For quite some time, every picture I took had airplanes running through them as they approached LAX.  However, around 11 pm, nearly all air traffic stopped so I was able to get several clear pictures.
Lonely
An old, abandoned truck in Rhyolite, NV

I took the above picture using the Rokinon 14mm.  After a while I wanted to switch things up and try a different perspective so I grabbed the "nifty-fifty" and set up for another series of shots.
Rollin'
Same truck, different perspective
This was fun to shoot and boring to shoot at the same time. Star trails take time. . .a lot of time.  After getting the focus dialed in, I set everything up to take 30 second exposures continuously for a little over an hour.  That was the boring part.  The fun part was the light painting. A few things to note: the caretaker's quarters were behind me and there were some outside lights. These light up the truck "naturally" so I didn't have to do anything there. I was shooting wide open with "nifty-fifty" (f/1.8) so it has a very shallow range of focus, the stars were in focus, but the truck was blurry as hell (this isn't a problem on the Rokinon 14mm because that thing has an insane depth of field).  I knew at a minimum that I would have take additional shots focused on the truck then stack them on top of the star fields, otherwise there would be pretty stars and blurry truck.  Since I was shooting "truck exposures" anyway, I decided to have some fun.  I turned my headlamp on red, shoved it in my flash diffuser and placed it around the truck.  The truck in the "Rollin'" shot is a composite of three photos: light in the cab, light in the engine compartment, and light behind the rear tire.

I have done star trails before, but have always been a bit dismayed by the way they turned out.  There are little gaps between each exposure (even though the shutter is technically only closed for a second or two) and I have also noticed that they sometimes look "stuttery". I did some reading and discovered a new way to process star trails. A guy named Floris Van Breugel created a custom script for Photoshop called the Star Trail Stacker that is supposed to eliminate gaps in star trails and I decided to try it out.  It did a really good job!  I am very impressed.  However, you may notice two gaps in the shot above.  These are due to a truck driving through my shot a few times.  Actually, the truck drove through the shot about 8 times in all, but most of them were far enough away that it didn't have much impact. . .twice he came right through the shot, and one of those times he pulled up behind me, flipped on his light bar (you know the kind people put on those big trucks) and lit up the entire scene for nearly a minute before honking and driving away. . .jerk. Anyway, I had to remove three frames from the sequence which is why there are gaps.

After the truck I drove around a bit more and found the old bank building, which is nothing more than a shell of a building.  Really cool. I set up and took a few shots here.

Polar Opposite
14mm
Stark Relief
50mm


I wasn't really planning on doing a star trail shot (hence why the trails are so short), but while in post I decided to see what it would look like if I tried.  I immediately noticed that the trails curve in opposite directions toward each corner.  I was confused for a moment then it hit me that I was facing almost due west and the wide field of view afforded by the 14mm means I nearly caught both "poles" in the frame.  This was a lucky accident.  Now that I know this is possible I want to try and set things up so that I somehow do capture both poles and do a longer exposure time to really highlight the trails.

The lighting came courtesy of yet another "security" light. However, this light was not as kind as the first one (truck).  Even though it was pretty far away (quarter mile or so), it was pretty garish and came in at a terrible angle.  I encountered some rather severe chromatic aberration in the form of pretty extreme green fringing on both of these shots.  Fortunately, we have YouTube and a quick search yielded me this video which introduced the Gaussian filter approach.  It still took a fair amount of work (especially on the 14mm shot) but I was able to get rid of most of the CA.

By the time I finished shooting the building it was a little after 1:30 AM. The Milky Way was supposed to be rising, but some clouds were coming in from the south, blocking the stars near the horizon.  I had two choices: a) drive into Death Valley, find an interesting spot and stay up until 4:30 AM hoping I could catch the Milky Way before the sun came up, or b) drive back to Vegas.  It was late, I was tired, I have been up/traveling since 7:00 that morning, and I had a conference to attend the next day.  I chose option B. The drive back to Vegas was uneventful and I made it to my hotel room around 5:30 AM, realized I left my phone charger in the car, had to walk through the casino, then through the Miracle Mile shopping plaza to get the damn thing, then walk all the way back, ugh.

The conference began on Tuesday, and that evening was the welcoming reception, held at the base of the High Roller.  The plan was to go to the reception then wander around taking night shots of Vegas after it was over. If you have ever been to Vegas you would know that everything is really far apart, so rather than going to the reception then back to the hotel to grab my camera gear I decided to just bring all of my gear with me. This, naturally?, got me nominated to be the "official" conference "photographer".  Why the quotation marks?  Because it wasn't really official in any real sense of the word.  Rather the SWMRA president saw that I had a camera and said, "hey, if you take pictures I will give you some extra drink tickets."  Sure!

I have never really been a fan of people in my pictures, so being asked to take pictures OF people was a little off putting, but it was fun.  While I have pictures of people posing, and looking at the camera, I quickly came to realize that I prefer taking candid shots of people just being people, preferably NOT looking at the camera.  All-in-all I enjoyed myself and even set up a "photo booth" with the Venetian serving as the backdrop.  I won't bore you with all of the people pictures.  Rather I have selected a few of my favorites to display below.

Some of these are from the STS party the following evening.  You can tell by the venue.


Lightroom
I caught the lights as they were changing color
Whose Got Big Balls?
Vegas reflected off a gondola "ball" on the High Roller


De-Feeted
The only group shot in which I appear
De-Feeted 2
Same shot, in color. Which do you prefer?
I need a selfie like I need a hole in my head
Took this while testing exposure/flash for the Venetian background.


This is actually my favorite picture of the evening

I've got big balls!
Vegas from the top of the world

I think I can see my house from here
7 shot panorama taken from the High Roller
The Last. . .um. . party?
I really like this. It was taken from partway down the hallway.  The walls and ceiling do a great job framing the scene and the green couches really POP. 
Cheers
Just a festive shot
Reflections
How did I take this without being in the reflection?
Up
Not sure how I feel about this.  thought it was interesting at the time


Eccentrica Gallumbits
The triple-breasted whore of Eroticon Six

If you managed to stay with me for this long then you get two bonus shots.  I mentioned that I wanted to do some blue hour / night shots of Vegas.  Well due to time and distance, I was limited to shooting. . the Bellagio fountain.  I know, I know, it is over shot, but it was still fun.  The first photo was taken after the welcome reception at close to midnight.  I started by taking a base exposure of around 20-30 seconds to get smooth water and then to bring out some of the colors.  When the show started I spent a minute or so playing around with my exposure.  I wanted to make sure that it was fast enough to capture the water, slow enough to get enough of the water/show a bit of movement, and wide enough to allow in enough light so you could see the water.  I settled on roughly half-second exposures.  Once that was determined, I held down the shutter button for the duration of the show.  For processing, I sorted through to find what I thought was the most interesting water shot, stacked it on the base shop then simply went to blend-->lighten. Boom

Liquid Ballet
I wanted something a bit different for the second fountain shot (taken the next day). After the sessions ended I ran outside to scout a location for blue hour.  I was pretty sure I wanted something with a bit of elevation, from the side, rather than straight on.  I found the perfect spot that also provided a panorama.  I got there and got set up right as one show was ending (around 7:30ish).  I started by taking a 5-shot blue hour panorama of the North strip. I again went with slightly longer exposures (5-10 seconds) because I wanted depth of color, smoother water, and maybe a bit of movement from the cars (wasn't really thinking about that).  Then. . .I waited. . .for half an hour. It turns out that prior to 8 PM, the Bellagio fountain only goes off once every 30 minutes, ugh.  Once the fountain started it was the same as the night before, quickly adjust settings and take a whole bunch of pictures.

Vegas Baby!!
Processing this shot was much more difficult for a variety of reasons.  The first was that I started with a panorama that included the fountain, then had to re-position the camera on the fountain and take the picture of the show. Obviously, I wasn't able to re-position the camera exactly as it was when I took the initial frame for the panorama, but I got it pretty damn close.  So, in post, after picking the fountain shot I wanted, I had to align the images, but needed to keep the base image still (typically Photoshop moves/distorts both images when auto-aligning. After some fiddling around and a lot of Google-foo, I managed to make it happen.  Then, I couldn't just use blend-->lighten because some parts of the base exposure were brighter than some parts of the fountain, so I had to play around with that a bit to make what I want show where I wanted it.  Then I had to deal with stitching the panorama together, which is actually a bit difficult when it contains moving objects such as cars pulling up to the stop light. So, there was a fair bit of manual aligning for the panorama too.  All-in-all I think it turned out fairly well, but it was a lot of work.